About
This page covers the use of Webmin’s System and Server Status module, which can be used to check for and report down systems, failed servers, network outages and other problems.
The module
This module allows you to monitor the status of various servers and daemons running on your system, so that you can easily see which are running properly and which are down. It can also be configured to check the status of servers on a regular schedule, and to email you or run a command if something goes down. This can be useful if your system runs critical servers that other people depend upon, such as web or DNS servers.
The module can also monitor servers running on other hosts. This can be done in two ways - by making a TCP or HTTP connection to the port that the server runs on, or by communicating with the Webmin server on the remote host and asking it to check the status of the server. The latter method is more powerful, because it can be used to monitor things such as disk space and daemons that do not accept any network connections.
Each server or service that you want to watch using the module must have a monitor defined. Every monitor has a type that indicates what kind of server it is supposed to check, such as Apache or BIND. Monitors also have additional parameters, some of which are specific to their type. The module allows you to create many different types of monitors, for things like checking if Postfix or Squid is running, watching for excessive network traffic or a shortage of disk space, or pinging or connecting to some host.
A monitor can run either on the system that you are using the module on, or another server running Webmin. In the latter case the server must be defined in the Webmin Servers Index module. Alternately, yo can check another system that does not have Webmin installed using the remote TCP, HTTP and ping monitor types.
Many monitors use other Webmin modules to find the locations of the servers and daemons that they checked. For this reason, those other modules must be configured and working properly for the associated monitor to work as well. For example, if you have compiled and installed Apache in a different directory to the standard for your Linux distribution, the module configuration for Apache Webserver will have to be adjusted to use the correct paths. If not, this module will not know where to look for the Apache PID file.
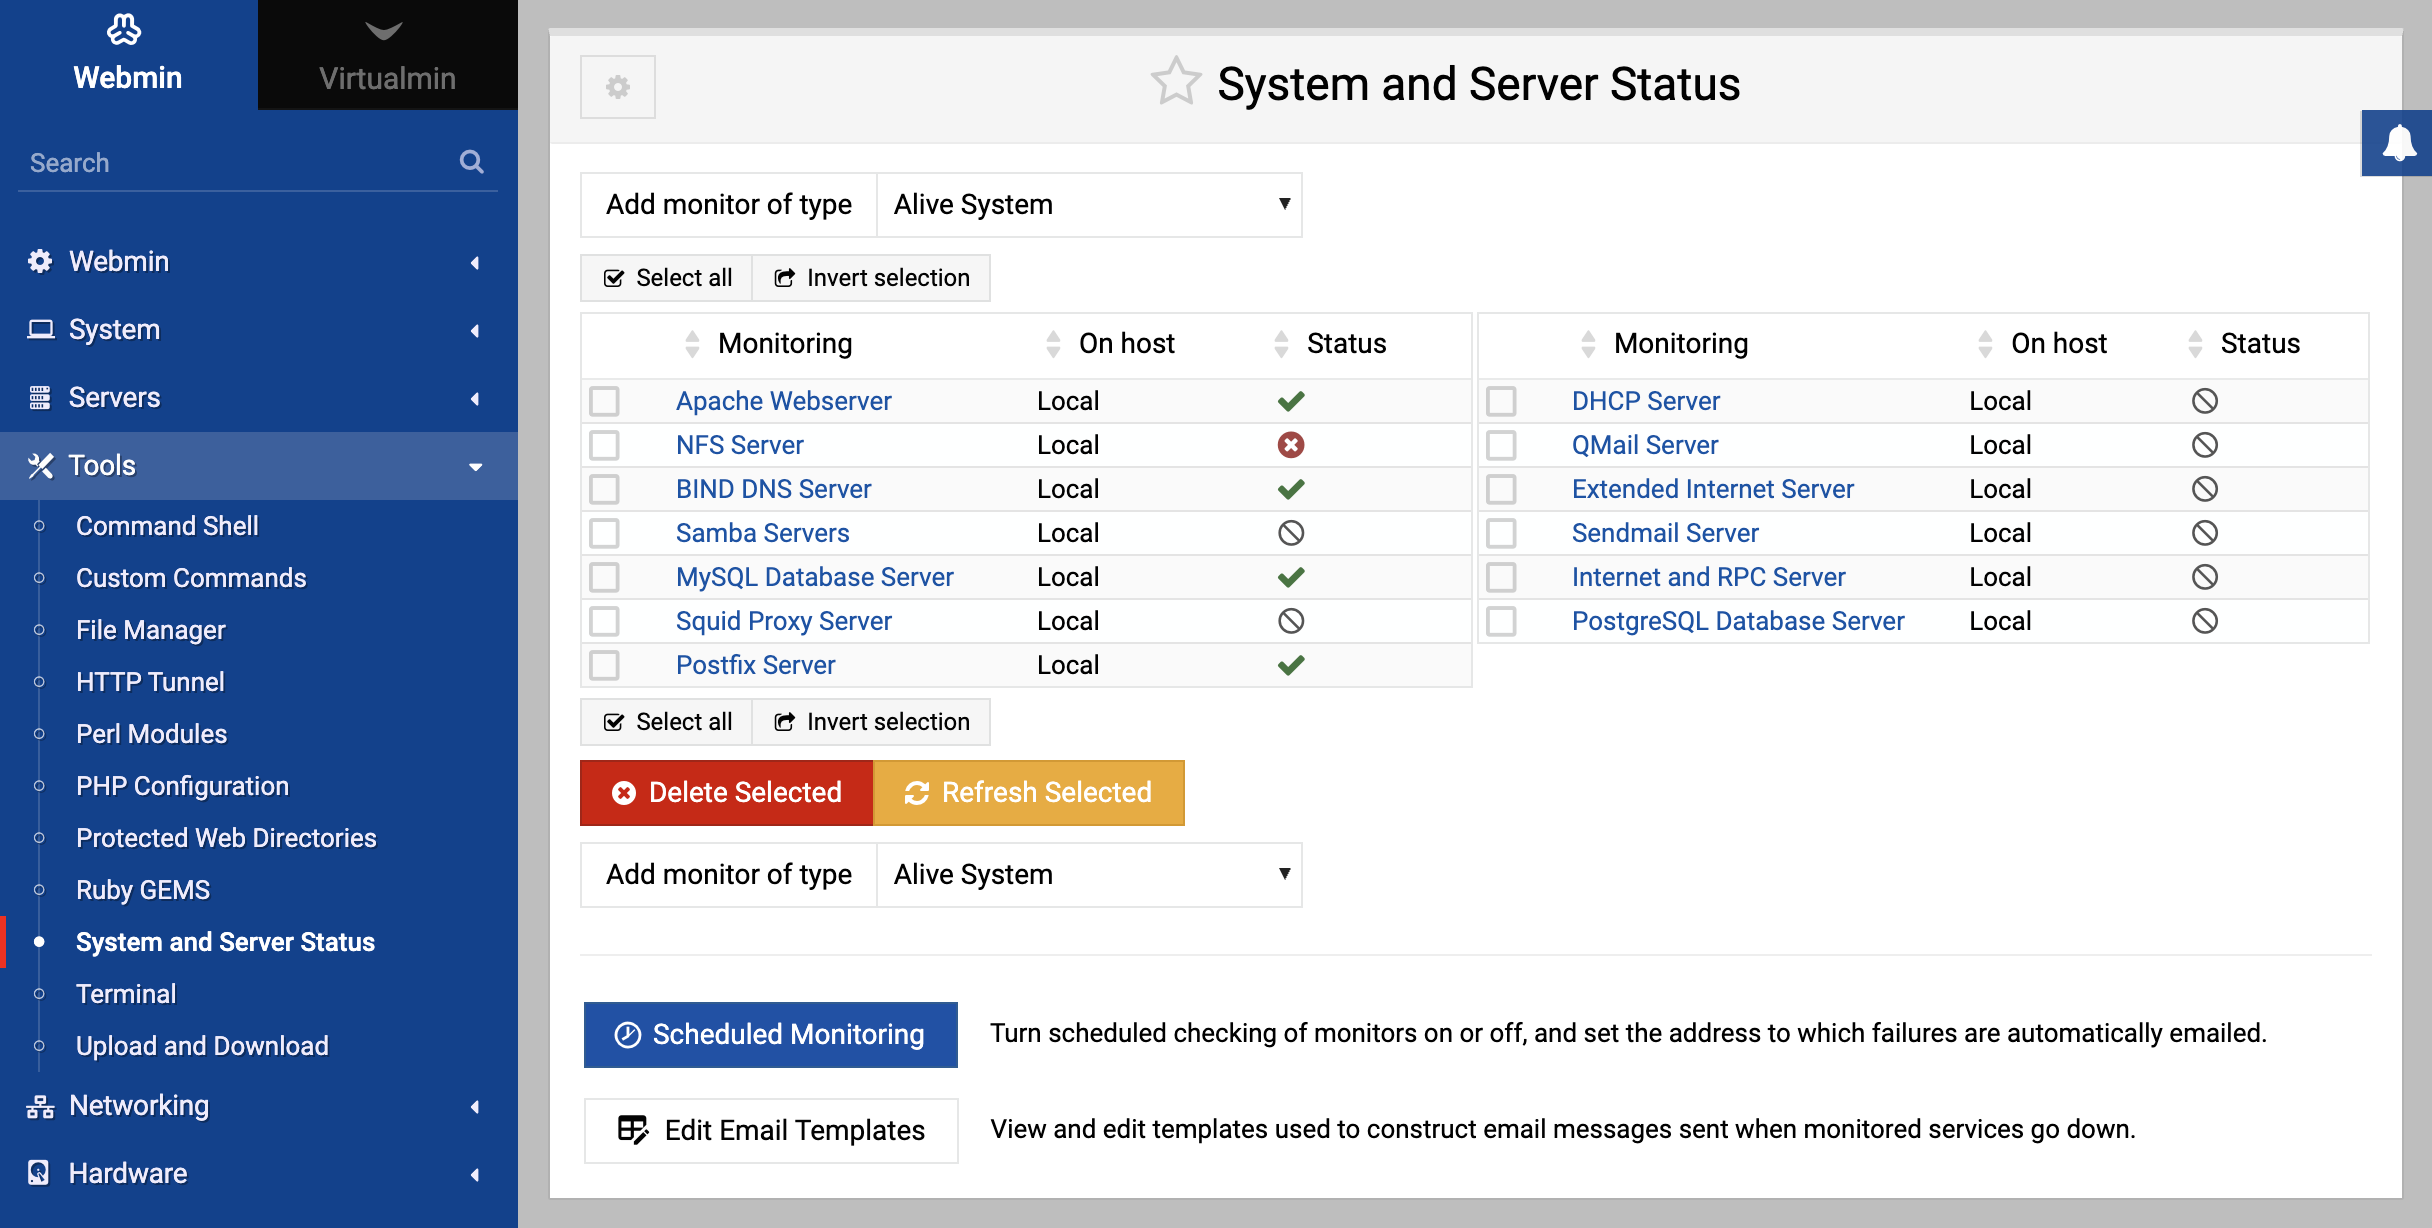
When you enter the System and Server Status module from the Tools category on the Webmin menu, its main page will display a table of all configured monitors. By default, several monitors for common servers and services will be defined, but you can edit, delete or add to them as you wish. The screenshot below shows an example of the module’s main page.
System and Server Status, a description, the Webmin server that it runs on and its current status are shown. A monitor can be in one of the following states:
Up
The monitored server or service is running correctly. This state is indicated by a green tick on the main page.
Down
Meaning that the monitored server is down. This state is indicated by a red X on the module’s man page.
Not installed
Meaning that the server being monitored is not installed on your system. This state is indicated by a black circle with a line through it.
Timed out
Meaning that the monitor took too long to execute. This state is indicated by a clock icon.
Webmin error
Meaning that the remote Webmin server to run the monitor on could not be contacted. This is represented by a red letter W.
By default, the status of every monitor is queried every time you view the module’s main page. Because this may take a long time if you have many monitors or are checking the status of servers on remote hosts, there in a module configuration option that can be used to display the status from the last scheduled check instead.
Adding a new monitor
To have Webmin check on the status of a new server or service, you must add an additional monitor in this module. Before you can do this, you must decide on the monitor’s type, which is determined by the type of service that you want it to check. See the Monitor types section below for a list of all those that are available, their purposes and optional parameters.
Once you have chosen a type, the steps to follow to add it are:
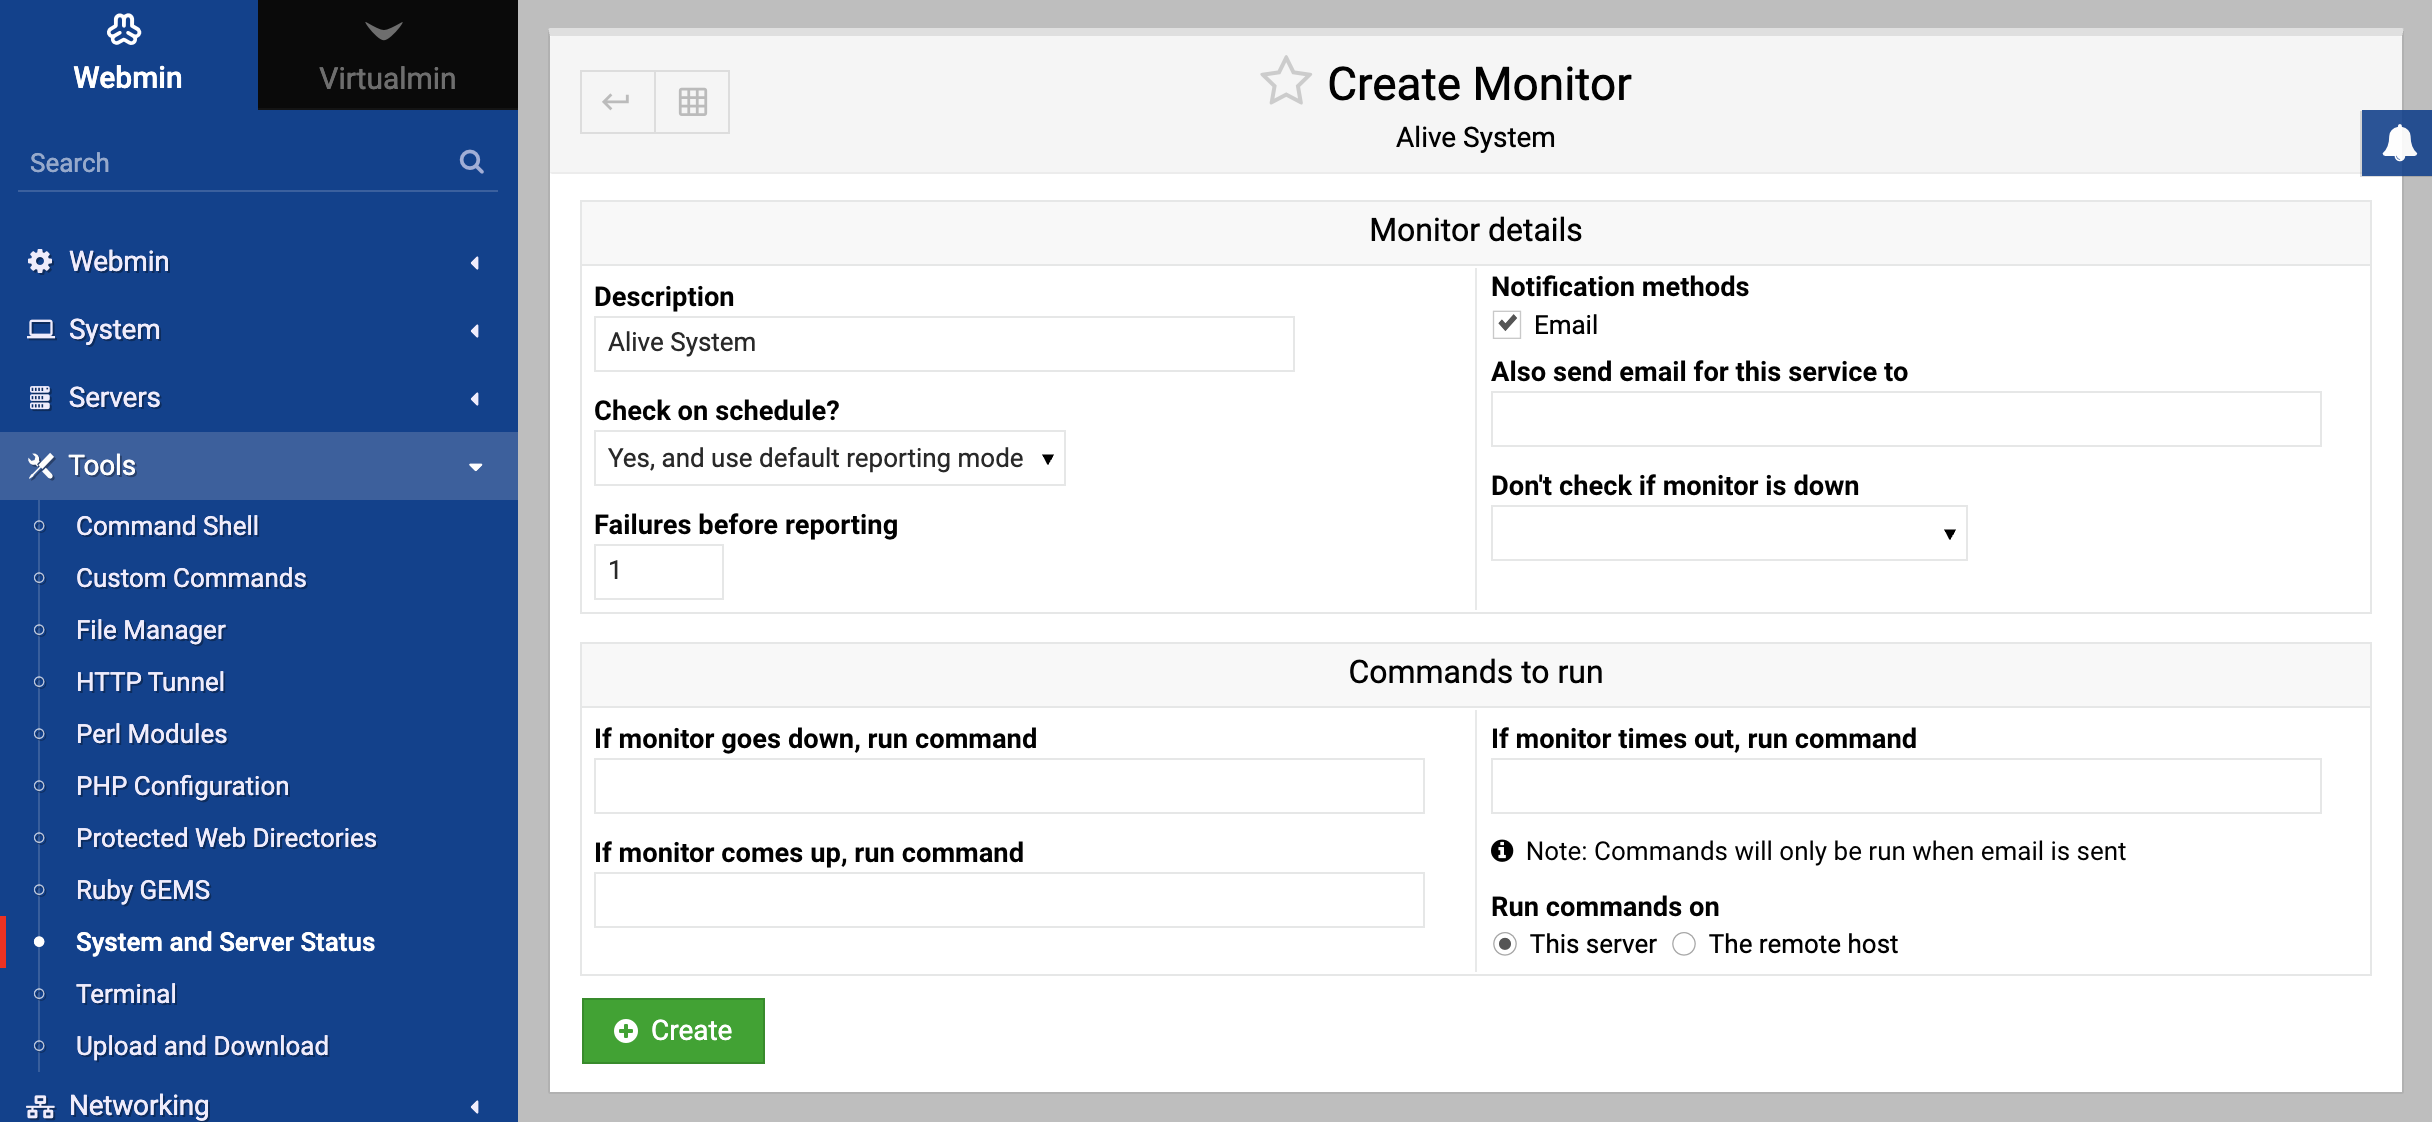
- Select the type from the menu next to the Add monitor of type button on the module’s main page. When you click the button, the browser will display a form for adding a new monitor as shown in the image below.
- Fill in the Description field with a short description of this monitor, such as Office webserver. This will appear on the main page and in any status emails.
- To have the monitor executed on another Webmin server, select it from the Run on host menu. If you have no servers defined in the Webmin Servers module (covered in Webmin Servers Index), no menu will appear.
- If you have scheduled monitoring enabled and want this service to be checked regularly by it, make sure the Check on schedule? field is set to Yes. If it is set to No, scheduled checking will be turned off for this particular monitor. The other options starting with Yes allow you to control when email is sent if the monitor goes up or down. They correspond to the options for the Send email when field, explained in the Setting up scheduled monitoring section.
- To have a command executed when a scheduled check determines that the monitor has gone down, enter it into the If monitor goes down, run command field. This could be used to attempt to re-start the monitored server, or to notify a system administrator by some method other than email.
- Similarly, you can fill in the In monitor comes up, run command field with shell commands to execute when a scheduled check determines that the service has come back up again.
- If the Run on host field is set to another Webmin server, you can choose whether the up and down commands in the previous two steps are run on this system or the remote server. This is controlled by the Run commands on field.
- If the monitor is being run locally and is checking a server configured in another Webmin module for which multiple clones exist, the Module to monitor field will appear on the form. This menu can be used to choose which of the clones the monitor should get its configuration from. So for example if you had two versions of Apache installed on your system and two Apache Webserver modules set up to configure them, you would be able to choose which one should be checked when creating an Apache webserver monitor.
- Depending on the type of monitor being created, there may be several additional options that you can set on this form. See the Monitor types section below for the details.
- When done, click the Create button to have the monitor created and added to the main page. Its status should be immediately displayed.
Existing monitors can be edited by clicking on their description on the main page. When editing, all the same fields as described above are available, in addition to a Current status field that indicates whether the service is up or down. For some monitor types, additional information is displayed when it is up, such as the time that the server being checked was started.
After you have finished editing a monitor, click the Save button at the bottom of the page to record your changes. To get rid of a monitor, use the Delete button instead. Either way, the changes will be applied immediately.
Monitor types
The System and Server Status allows you to monitor many different kinds of servers and daemons, using different monitor types. All types perform some kind of check, and either succeed or fail depending on whether the check passes or not. In some cases, a monitor can return a third result indicating that the server being checked is not installed or that the check that it is trying to perform is impossible.
Not all monitors are available on all operating systems. Because they use Linux specific files in /proc, the Free Memory and Network Traffic monitors are only available on that OS. The Load Average type can only be used on systems that support the Running Processes module, and the Disk Space monitor will only work on systems that the Disk and Network Filesystems module has been ported to.
In addition, many monitors depend upon other Webmin modules. For example, if the Apache Webserver module has been deleted from your Webmin installation, you will not be able to use the Apache monitor type. If you attempt to add a new monitor that depends upon a module that is not installed or will not work on your operating system, an error message will be displayed when the Create button is clicked.
Setting up scheduled monitoring
The monitors that you can configure using this module are most useful when they are run on schedule, so that you can be automatically notified via email if a monitored server or daemon goes down. When scheduled checking is enabled, all your monitors will be run at a periodic interval, just as they are all run when you visit the module’s main page.
To set up scheduled monitoring, the steps to follow are:
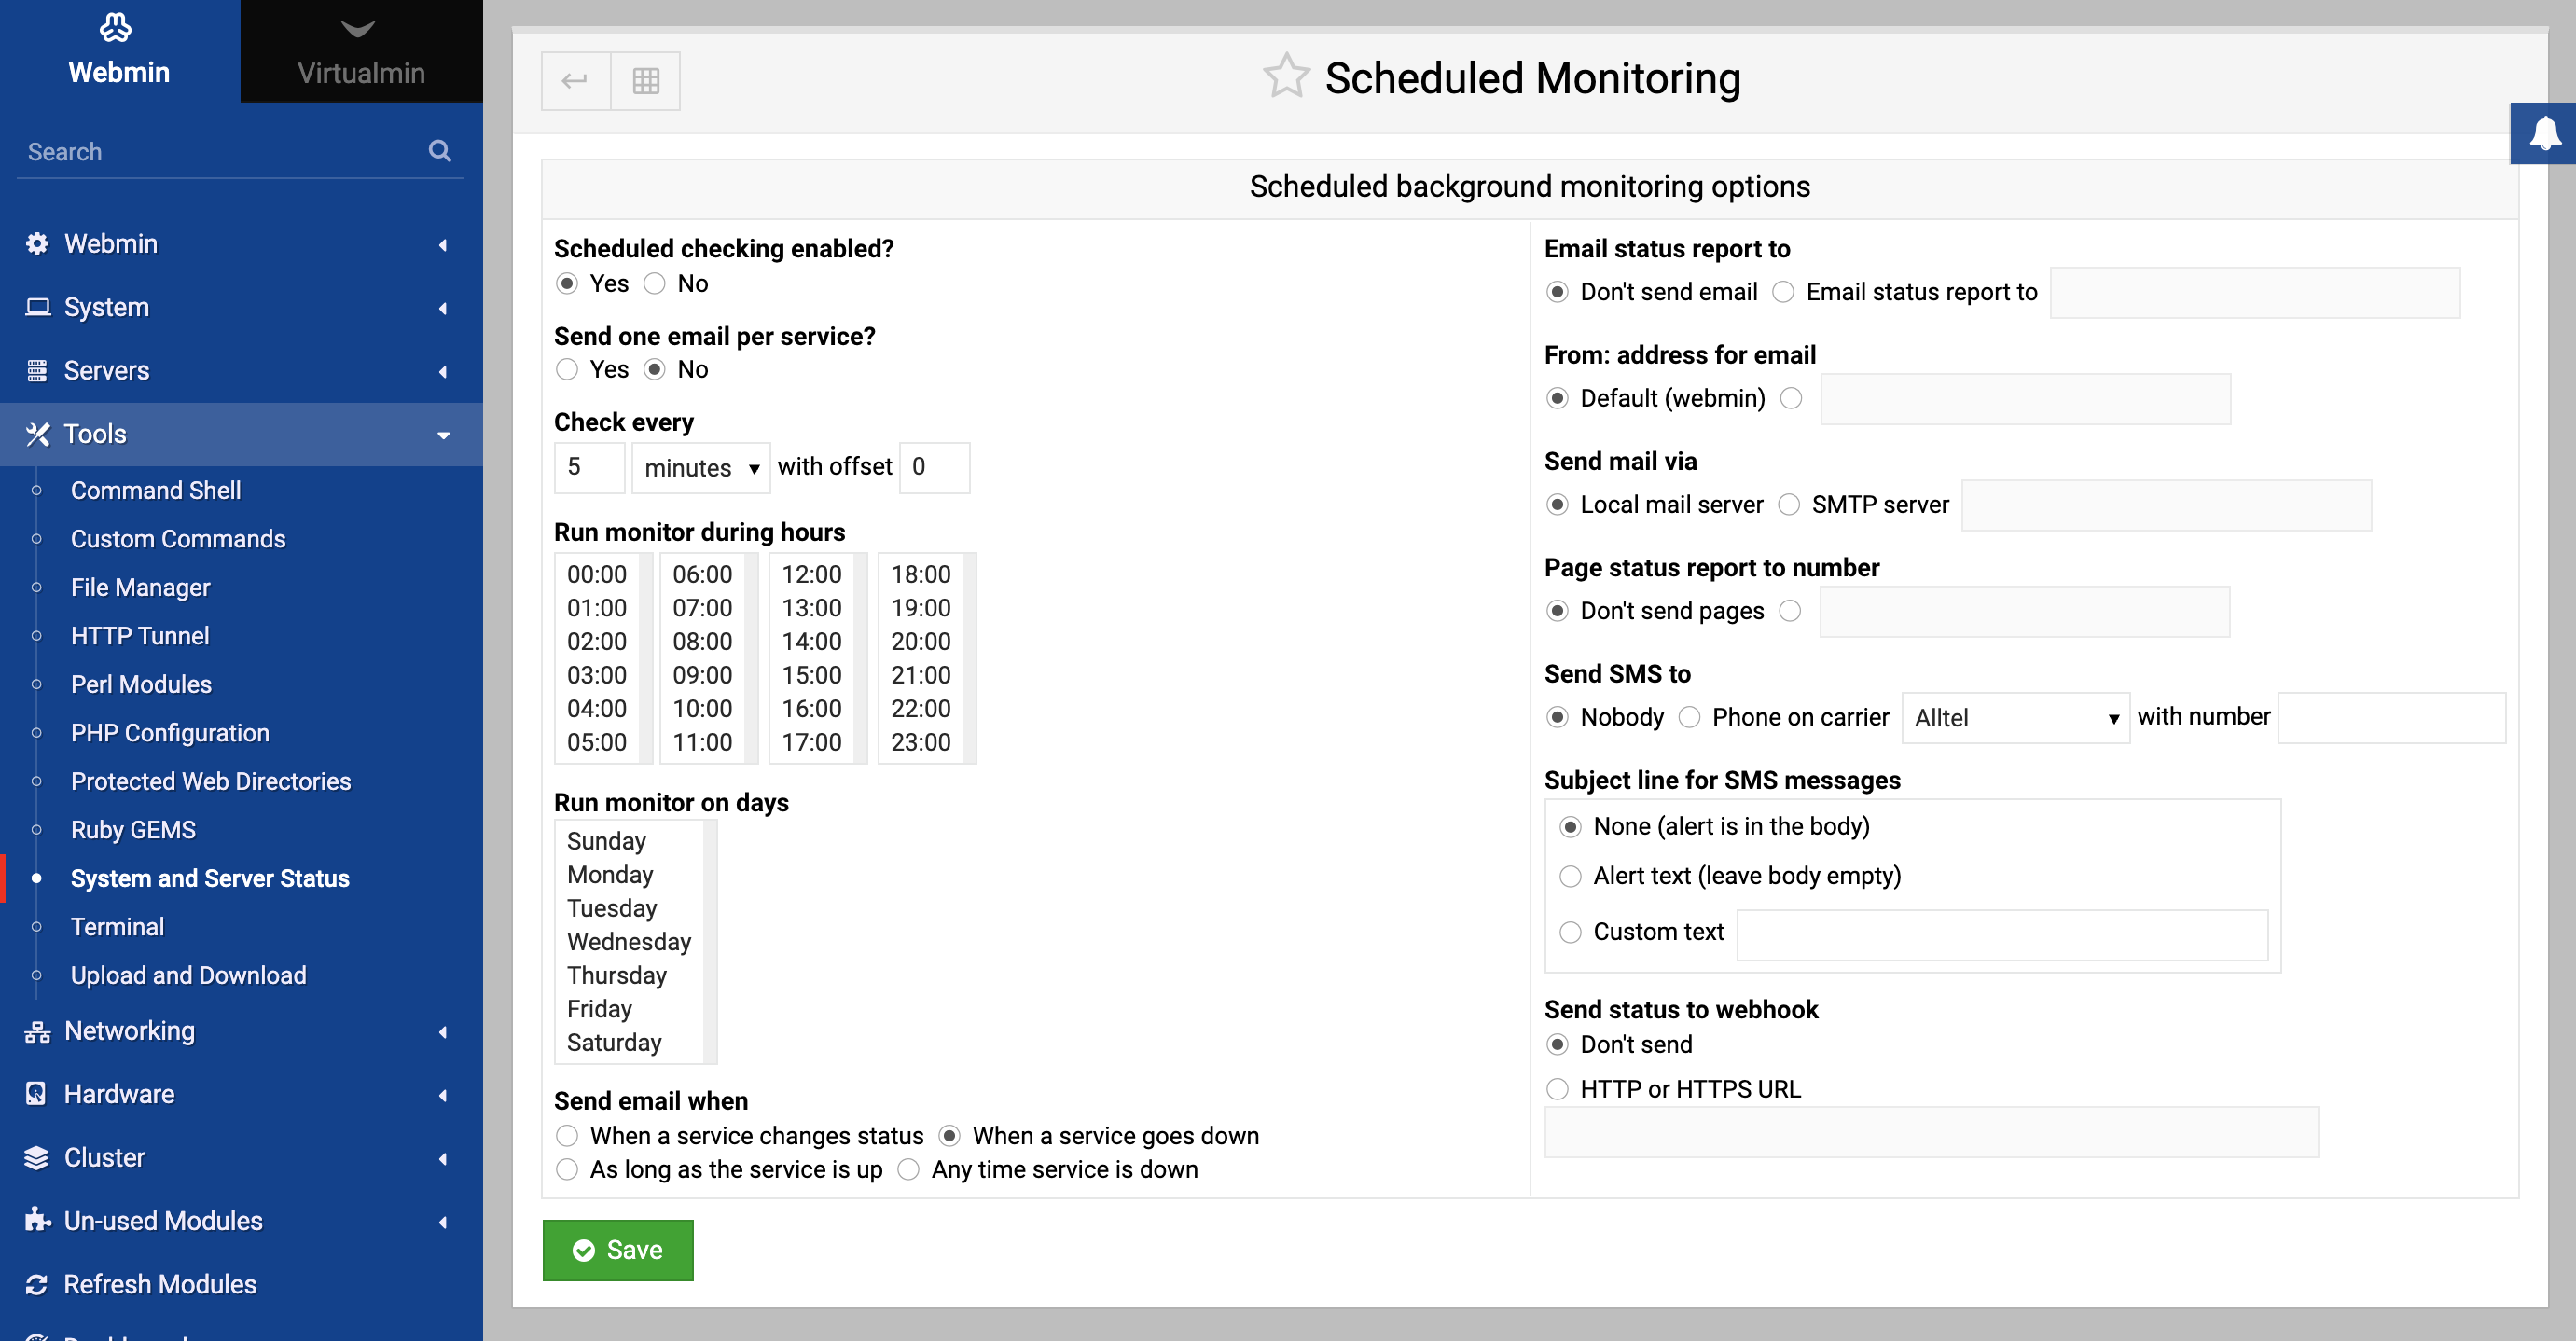
- On the module’s main page, click on the Scheduled Monitoring button below the table of monitors.
- Change the Scheduled monitoring enabled? field to Yes.
- The Check every field controls when the scheduled check is run. The first lets you set the period, such as every 1 hour or 5 minutes, while the second part controls how many hours or minutes into the period it is run. For example, to have the monitors checked at 3:00 a.m. every day, you would set the Check every field to 1 days, and the with offset field to 3.
- To limit the check to only certain hours of the day, de-select those hours that you don’t want it to run on from the Run monitor during hours list. This does not make much sense if the scheduled check is being run only once per day.
- Similarly, to limit the check to certain days of the week, de-select the days that you don’t want it to run from the Run monitor on days list.
- The Send email when field determines which events will cause an email message to be sent by the scheduled check. If When a service changes status is chosen, email will be sent when a service goes down or up. If When a service goes down is chosen, email will only be sent when a service is detected to have gone down. If Any time service is down is chosen, email will be sent as long as any service is down, and will be sent again at each check until it comes back up. It is possible to override this field on a per-monitor basis using the Check on schedule field on the monitor creation form.
- To receive email when a service goes down, enter your address into the Email status report to field. If it is left set to Nobody, then no email will be sent.
- To set the source address of the status email, change the From: address for email field. The default is just webmin@yourhostname.
- By default, any status email will be sent by running the sendmail program on your system. To have it sent via an SMTP server on another system, change the Send mail via field to SMTP server and enter the hostname of the mail server into the field next to it.
- If you want to receive on email for each monitor that goes down, change the Send one email per service? field to Yes. Otherwise all services that are determined to have failed by a single check will be reported in a single email.
- If you have a pager command set up and working on the module’s configuration, you can enter a pager number into the Page status report to number field. It will receive a shortened version of the message that is sent via email.
- Click the Save button at the bottom of the page to activate scheduled monitoring. Webmin will automatically set up a Cron job that runs a script on the chosen schedule.
Once scheduled monitoring is active, you should begin receiving email messages notifying you when services go down and come back up. However, if a service is down when scheduled checking is first enabled and you have chosen to be only notified when services go down or come up, you will not receive a message about it.
To modify any of the scheduled monitoring options, just repeat the steps above again. To turn it off altogether, change the Scheduled monitoring enabled? field to No and click Save. If you want to change the monitoring schedule, it is best to do it in this module instead of in the Scheduled Cron Jobs module.
Module access control
You can grant Webmin user the right to only see the current status of configured monitors but not to create or edit them. This can be done in the Webmin Users module. Once you have created a user who has access to the module, follow these steps to give him read-only access:
- In the Webmin Users module, click on System and Server Status next to the name of the user or group that you want to restrict.
- Change the Can edit module configuration? option to No, to prevent him changing display options.
- Set the Can create and edit monitors? field to No, so that he can only view the status of existing monitors.
- Set the Can change scheduled monitoring? field to No.
- Click the Save button to make the module access control restrictions active.


